Omnis Technical Note TNJS0003Jan 2022
Setting Up The Omnis App Server
for Omnis Studio 6.1/8.x or above
by Jason Gissing
Updated January 2022
The server side of your Omnis web and mobile application comprises the Omnis App server that runs your Omnis library, and, optionally, a web server and/or a database server. All these parts need not run on the same machine, but typically would be on the same LAN or subnet, communicating via TCP/IP.
It is possible for clients to connect directly to your Omnis App Server
to run your application. While this is the simplest solution, if you are
expecting a reasonable volume of concurrent connections you would be better
served by using a web server for its more sophisticated traffic management.
You may also prefer to use a web server to preserve the URL format used
throughout your brand's web identity. When using a web server, the web server hosts the HTML pages containing
the Omnis JavaScript client object that references the remote forms in
your application.
This tech note describes how you can set up your web server and the Omnis App Server, which can be located on a Windows, macOS, or Linux machine.
From Studio 8.1, you can use a Headless version of the Linux Omnis App Server to deploy your apps: this is described here.
Please select below for details on how to set up a particular configuration:
| Using Direct Connection |
| Through a Web-Server: | |||
| Windows | Apache | IIS | Tomcat |
| macOS | Apache | ||
| Linux | Apache | ||
IIS - Windows
-
Make sure that IIS and the required modules are installed on the web server that will be running your Omnis web/mobile application:
For Server editions of Windows:
- Open Server Manager, and from the Manage menu select Add Roles and Features.
- Follow through the wizard to select your server.
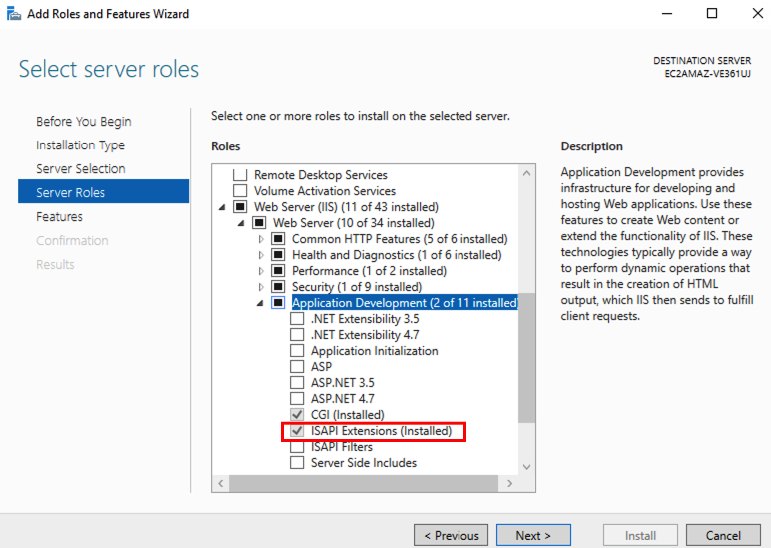
- When you reach the Server Roles section, drill into Web Server (IIS) -> Web Server -> Application Development and ensure that ISAPI extensions (or CGI if you are using the CGI plugin) is installed.
For Desktop editions of Windows:
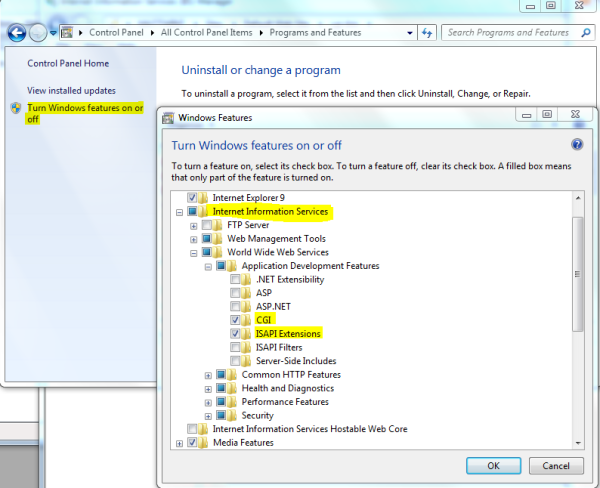
- Go to Control Panel -> Programs -> Turn Windows Features on or off.
- Make sure that Internet Information Services is checked, and also CGI and ISAPI Extensions when you drill down into World Wide Web Services -> Application Development Features.
-
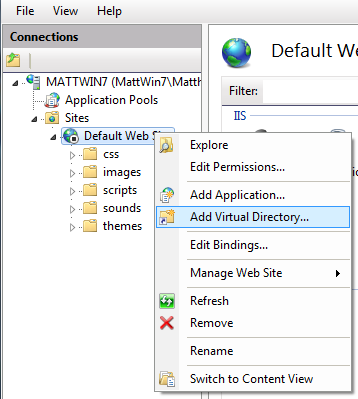
You need to create a script alias folder, which will be a location from which the Omnis Web Server Plug-In can be executed. Open IIS Manager, locate your website in the sidebar, right-click it and Add Virtual Directory.
-
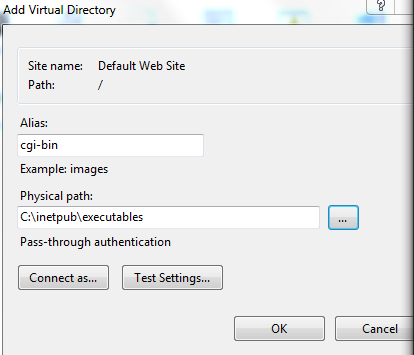
Give the virtual directory an Alias name of cgi-bin. For the Physical Path create a directory (or point to an existing directory) of your choice.
-
Locate the Omnis Web Server plug-in 'omnisapi.dll' in the 'webserver\isapi' folder of your Omnis Server installation and copy it into the physical location of your cgi-bin virtual directory. (You can use a CGI plug-in 'nph-omniscgi.exe', but this is not as fast as the plug-in built for IIS.)
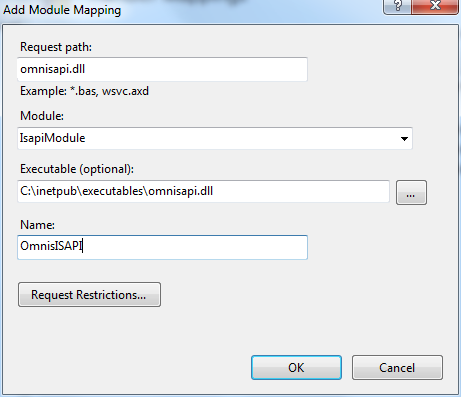
Select your cgi-bin virtual directory in the IIS sidebar, then select Handler Mappings, and Add Module Mapping.
- Set the Request path as omnisapi.dll (or nph-omniscgi.exe). Do not use *.dll or *.exe as this will cause problems when you have both the Omnis Web App Server scripts and the Omnis Web Service Scripts (OWSisAPI.dll, NPH_OWScgi.exe) installed.
- Set the Module as IsapiModule from the droplist (or CgiModule if you are using the nph-omniscgi.exe).
- Give it a Name of your choice, e.g. OmnisISAPI.
-
Once you have added your module mapping, select Edit Feature Permissions from the Handler Mappings' Actions sidebar and make sure that Execute is checked.
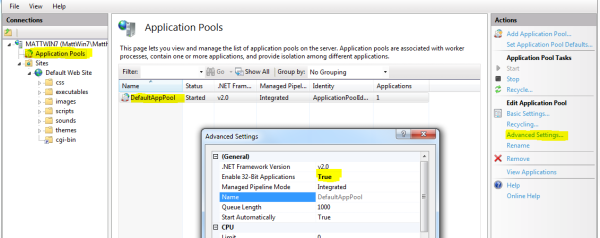
Note - If you are using the Omnis Web App Server Plugins (omnisapi.dll nph-omniscgi.exe) from a 64bit copy of Omnis Studio, then Select Application Pools, then your pool, and Advanced Settings. Set the Enable 32-bit Applications to False.
Otherwise, ensure that Enable 32-bit Applications is set to True.
-
Earlier versions of IIS may not include a MIME type for JSON files. This is required for the JS Client from version 10.2. Check that this is enabled:
- Select the root (or whichever level you want it to apply from) of your web server in IIS, and open MIME Types.
- Check that there is an entry for .json extensions, and that its "MIME Type" is set to application/json.
- If not, add it.

-
(If you are setting up the RESTful web server plugin, you should repeat the previous steps, but use omnisrestapi.dll instead of omnisapi.dll)
-
Restart your web server.
Apache - Windows
-
Install the Apache Web Server. You may like to use the pre-compiled Win32 binaries, which you can download from here.
Choose one of the Omnis web server plug-ins:
A CGI executable (nph-omniscgi.exe), or an Apache module (mod_omnis.dll).
The Apache module is faster, so is the best option in most cases.
Note: The architecture of the mod_omnis.dll should match that of the Apache web server you are using, e.g. you should use the 64-bit version of mod_omnis.dll with the 64-bit version of Apache.
The directory layout examples used in the following instructions may not match that of your own installation. Some default installation layouts for Apache HTTPD on various operating systems and distributions are listed here.
It is not recommended to copy and paste the given content when configuring files, as line endings may cause issues.
Select below for instructions on the plug-in of your choice:
-
Once Apache is installed, locate the httpd.conf file, which should be in the conf folder of the Apache installation.
E.g: C:\Program Files (x86)\Apache Software Foundation\Apache2.4\conf\httpd.conf.
Open the file with a text editor and find the ScriptAlias section.

-
The default name & location of the ScriptAlias area is fine as it is, but feel free to customise the paths if you wish. The ScriptAlias will point to the folder which contains executable files your web server can run.
E.g: ScriptAlias /cgi-bin/ " C:/Program Files (x86)/Apache Software Foundation/Apache2.4/cgi-bin/"
If you do change this from the default, you may need to alter other parts of the conf file, as described in the file's comments.
-
You should also search the file for the LoadModule section, and ensure that the line which loads mod_cgi.dll is not commented out.
-
Next you need to copy the nph-omniscgi.exe file from the /webserver/cgi/ folder in your Omnis Server installation into the folder referenced by your ScriptAlias.
E.g: C:\Program Files (x86)\Apache Software Foundation\Apache2.4\cgi-bin
For REST based Web Services you need to use the file nph-omnisrestcgi.exe, instead of the standard plug-in and use the same configuration
-
The Apache module is named mod_omnis.dll and can be found in the /webserver folder of your Omnis Server installation.
The file itself is located in the /apache24 folder, copy the appropriate mod_omnis.dll into the /modules folder of your Apache web server installation.
E.g. C:\Program Files (x86)\Apache Software Foundation\Apache2.4\modules -
Navigate to your Apache installation's /conf folder, and open httpd.conf with a text editor.
Locate the section which contains a series of lines beginning "LoadModule...", and add the following line to the end of this section:
LoadModule omnis_module modules/mod_omnis.dll
-
Now add the following section to the bottom of the httpd.conf file:
<IfModule omnis_module>
	<Location /omnis_apache>
		SetHandler omnis-apache
	</Location>
</IfModule>
-
For REST based Web Services you need to use the file mod_omnisrest.dll, instead of the standard plug-in, and configure it as follows:
LoadModule omnisrest_module modules/mod_omnisrest.dll
and
<IfModule omnisrest_module>
	<Location /omnisrest_apache>
		SetHandler omnisrest
	</Location>
</IfModule>
Requests sent to "/omnisrest_apache" will then be passed to the RESTful plugin.
-
Restart your Apache Server.
Tomcat - Windows
-
Download and install Tomcat from Apache. Apache offers several different binary distributions, but for ease of use you may like to download the Windows Service Installer.
-
Copy the entirety of the omnisservlet folder from the /webserver/ folder of your Omnis Server installation into the webapps folder of your Tomcat installation.
E.g: C:\Program Files (x86)\Apache Software Foundation\Tomcat 7.0\webapps\
Note - Releases of Omnis up to and including 5.2.3 had issues with their included java servlet. If you are using one of these versions of Omnis, please contact support for an updated servlet.
If you wish to rename the omnisservlet folder, then do so, but bear in mind that you will need to use this new name when assigning the WebServerURL attribute of the .htm form later.
-
By default, Tomcat's document root folder is webapps, but in order to avoid polluting this folder, we recommend you set up a seperate document root for your Omnis apps.
Navigate to Tomcat's conf folder and open server.xml with a text editor.
Locate the <Host> tag, and inside this create a new <Context> tag, with the following attributes:

-
-
docBase - This will be the absolute path to the folder which you wish to be the document base for your Omnis apps. This is where you will put your form's .htm file, and all of the scripts/css folders etc, on which it relies (Explained further on).
A useful technique is to set this to the html folder of your Omnis App Server installation, as this is where these files will be by default, saving you the need to copy them elsewhere. -
path - This will be an alias by which you will be able to refer to this custom document root.
E.g. If you set this to "myomnisapps", you will be able to refer to a file in this document root named "js1.htm" by visiting http://<Tomcat server address>/myomnisapps/js1.htm.
-
-
Restart your Tomcat server.
Apache - macOS
macOS includes an Apache server as part of the OS, so no installation is necessary. You can start the Apache server by executing the following command in a terminal :
sudo apachectl start
Choose one of the Omnis web server plug-ins:
A CGI executable (nph-omniscgi), or an Apache module (mod_omnis.so).
The Apache module is faster, so is the best option in most cases.
Note: The architecture of the mod_omnis.so should match that of the Apache web server you are using, e.g. you should use the 64-bit version of mod_omnis.so with the 64-bit version of Apache.
(In order to check your version of Apache, you can execute apachectl -V on the command line, then note the displayed Architecture)
The directory layout examples used in the following instructions may not match that of your own installation. Some default installation layouts for Apache HTTPD on various operating systems and distributions are listed here.
It is not recommended to copy and paste the given content when configuring files, as line endings may cause issues.
Select below for instructions on the plug-in of your choice:
-
Locate the httpd.conf file, which should be located at:
/private/etc/apache2/httpd.conf.
Open the file with a text editor and find the ScriptAliasMatch section.
This makes use of regular expressions for the matching of URL paths

-
The default name & location of the ScriptAlias area is fine as it is, but feel free to customise the paths if you wish (find out more from the Apache docs).
The ScriptAlias will point to the folder which contains executable files your web server can run.E.g: ScriptAliasMatch ^/cgi-bin/((?!(?i:webobjects)).*$) "/Library/WebServer/CGI-Executables/$1"
If you do change this from the default, you may need to alter other parts of the conf file, as described in the file's comments.
-
You should also search the file for the LoadModule section, and ensure that the line which loads mod_cgi.so is not commented out.
-
Next you need to copy the nph-omniscgi file from the /webserver/cgi/ folder in your Omnis Server instalation into the folder referenced by your ScriptAlias.
E.g: /Library/WebServer/CGI-Executables/
For REST based Web Services you need to use the file nph-omnisrestcgi, instead of the standard plug-in and use the same configuration
-
The Apache module is named mod_omnis.so or mod_omnisrest.so for (REST based Web Services) and these can be found in the webserver folder of your Omnis Server installation. The file itself is located in the apache24 folder
Locate the Root directory of the WebServer this should be in /Library/Webserver/ and add a new folder omnis_modules
Copy the appropriate mod_omnis.so into the new folder /Library/Webserver/omnis_modules/

-
Navigate to /private/etc/apache2, and open httpd.conf with a text editor.
As of macOS Monterey (12) you now need to add the name of the codesigniture certificate for the Aapche module this will already have an Omnis code signiture ("Developer ID Application: Omnis Software Ltd (B6959HWR8Y)")
Locate the section which contains a series of lines beginning "LoadModule...", And add the following line to the end of this section:
LoadModule omnis_module "/Library/WebServer/omnis_modules/mod_omnis.so" "Developer ID Application: Omnis Software Ltd (B6959HWR8Y)"

And for macOS versions prior to Monterey (12) where the codesigniture certificate is not required you can just simply add:
LoadModule omnis_module /Library/WebServer/omnis_modules/mod_omnis.so
-
Now add the following section to the bottom of the httpd.conf file:
<IfModule omnis_module>
	<Location /omnis_apache>
		SetHandler omnis-apache
	</Location>
</IfModule>

-
For REST based Web Services you need to use the file mod_omnisrest.so, instead of the standard plug-in, and configure it as follows:
LoadModule omnisrest_module "/Library/WebServer/omnis_modules/mod_omnisrest.so" "Developer ID Application: Omnis Software Ltd (B6959HWR8Y)"
and
<IfModule omnisrest_module>
	<Location /omnisrest_apache>
		SetHandler omnisrest
	</Location>
</IfModule>
(Requests sent to "/omnisrest_apache" will then be passed to the RESTful plugin)
-
Restart your Apache Server. To do so you can execute the following command in a terminal:
sudo apachectl restart
Apache - Linux
-
Install the Apache Web Server (e.g. using your Linux distribution package manager).
Choose one of the Omnis web server plug-ins:
A CGI executable (nph-omniscgi), or an Apache module (mod_omnis.so).
The Apache module is faster, so is the best option in most cases.
Note: The architecture of the mod_omnis.so should match that of the Apache web server you are using, e.g. you should use the 64-bit version of mod_omnis.so with the 64-bit version of Apache.
(In order to check your version of Apache, you can execute apachectl -V on the command line, then note the displayed Architecture)
The directory layout examples used in the following instructions may not match that of your own installation. Some default installation layouts for Apache HTTPD on various operating systems and distributions are listed here.
It is not recommended to copy and paste the given content when configuring files, as line endings may cause issues.
Select below for instructions on the plug-in of your choice:
-
Once Apache is installed, locate the httpd.conf file, which should be in the conf folder of the Apache installation.
E.g: /etc/apache2.4/httpd.conf.
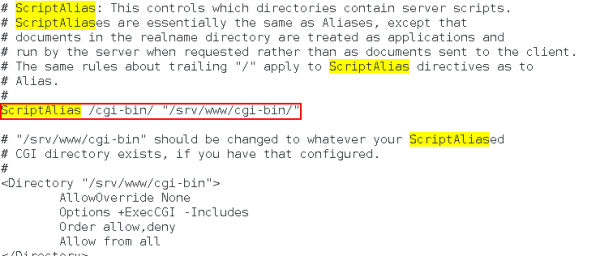
Open the file with a text editor and find the ScriptAlias section.
In some versions of Apache, the config details may be distributed throughout several .conf files to separate the configuration of different areas. If ScriptAlias is not referenced in httpd.conf, it may be in another file which httpd.conf references as an Include, such as default-server.conf.
-
The default name & location of the ScriptAlias area is fine as it is, but feel free to customise the paths if you wish. The ScriptAlias will point to the folder which contains executable files your web server can run.
E.g: ScriptAlias /cgi-bin/ "/srv/www/cgi-bin/"
If you do change this from the default, you may need to alter other parts of the conf file, as described in the file's comments.
-
You should also search the file for the LoadModule section, and ensure that the line which loads mod_cgi.so is not commented out.
-
Next you need to copy the nph-omniscgi file from the /webserver/cgi/ folder in your Omnis Server installation into the folder referenced by your ScriptAlias.
E.g: /srv/www/cgi-bin/
-
Locate your Apache Config File which contains the LoadModule directives. This may be inside the httpd.conf file, but in some distributions, this has been moved to a seperate conf file, e.g: apache2.4/sysconfig.d/loadmodule.conf.
Open this file with a text editor, and note the location from which the other modules are loaded (e.g. /usr/lib/apache2.4-prefork/).
Add a new line to the end as follows:LoadModule omnis_module <Modules Directory>/mod_omnis.so
If your Apache installation includes the Module Locations /mods-enabled and /mods-available (e.g. /etc/apache2/mods-enabled), use Apache Module (Ubuntu/Debian).

-
The Omnis App Server installation includes Apache modules for Apache 2.4 Server versions. These are in appropriately named folders in your Omnis Server installation's /webserver folder. Copy the mod_omnis.so which matches your Apache server version from here into the directory specified in the LoadModule directive above.
e.g. /usr/lib/apache2.4-prefork/mod_omnis.so -
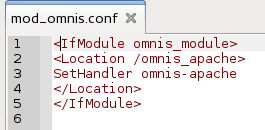
Create a new file in the Server Root folder named mod_omnis.conf. Give the file the following content:
<IfModule omnis_module>
	<Location /omnis_apache>
		SetHandler omnis-apache
	</Location>
</IfModule>
-
You must now tell the main Apache configuration to load your mod_omnis.conf file.
Open your Apache Config File, and add the following line to tell it to include the config file you just created:Include /etc/apache2.4/mod_omnis.conf

-
For REST based Web Services you need to use the file mod_omnisrest.so, instead of the standard plug-in, and configure it as follows:
LoadModule omnisrest_module <modules directory>/mod_omnisrest.so
and
<IfModule omnisrest_module>
	<Location /omnisrest_apache>
		SetHandler omnisrest
	</Location>
</IfModule>
(Requests sent to "/omnisrest_apache" will then be passed to the RESTful plugin)
-
Restart your Apache Server.
Execute the following command in a terminal (may vary based on Linux distribution/Apache version):sudo service apache2 restart
-
The Omnis App Server installation includes modules for Apache Server 2.4. These are in appropriately named folders in the /webserver directory of your Omnis Server installation.
Copy the required Omnis Module file(mod_omnis.so/mod_omnisrest.so) which matches your Apache Server version from here into the Modules directory of your Apache Server installation.
e.g. /usr/lib/apache2/modules/mod_omnis.so -
Remove execute permissions from the Omnis Module files:
sudo chmod -x <Modules Directory>/mod_omnis*
-
Create a module load file.
Create a new file in the /mods-available directory and name it omnis.load.
Add the following content to the file:LoadModule omnis_module <Modules Directory>/mod_omnis.so
-
Create a configuration file in the same location named omnis.conf and add the following content:
<IfModule omnis_module>
	<Location /omnis_apache>
		SetHandler omnis-apache
	</Location>
</IfModule>
-
Enable the Omnis module.
sudo a2enmod omnis
If your Apache installation doesn't include the Module Locations /mods-enabled and /mods-available (e.g. /etc/apache2/mods-enabled), use Apache Module (other).
-
For REST based Web Services you need to use the file mod_omnisrest.so, instead of the standard plug-in, and configure it, using separate omnisrest.load and omnisrest.conf files, as follows.
Module load file (omnisrest.load):
LoadModule omnisrest_module <Modules Directory>/mod_omnisrest.so
Configuration file (omnisrest.conf):
<IfModule omnisrest_module>
	<Location /omnisrest_apache>
		SetHandler omnisrest
	</Location>
</IfModule>
Enable module:
sudo a2enmod omnisrest
(Requests sent to "/omnisrest_apache" will then be passed to the RESTful plugin)
-
Restart your Apache Server.
Execute the following command in a terminal (may vary based on Linux distribution/Apache version):sudo service apache2 restart
Install and configure the Omnis App Server
-
Download the Omnis App Server from here (Called 'Server' on that page).
Install it, then run it and enter your Server version serial number.
When running on Windows, you can set the Omnis App Server up to run as a service. Should you wish to do so, see this technote.
-
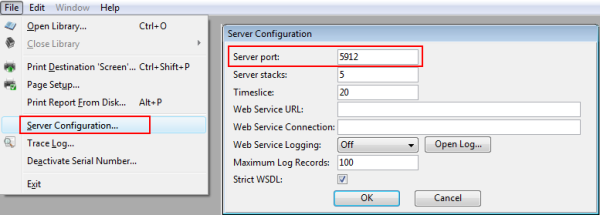
In Omnis, open the File menu, select Server Configuration, and enter a value for the Server Port (e.g. 5912). This is the port that your Omnis server will listen on, so it's important to make sure that you don't give this a port which conflicts with anything else running on your machine.
-
You will probably want your Omnis library to start automatically with the Omnis Server. To do this, you just need to copy the library into the /startup directory of your Omnis Server installation.
-
Back in your Development version of Omnis Studio, make sure that you have tested all of the forms that your users will need to connect to (Right-click the form and select Test Form). This will generate a .htm file in /html
(Note, on Windows Vista & later, this is part of the writable files part of the installation, which is located at C:\Users\<username>\AppData\Local\Omnis Software\OS<version>.)
-
Copy the generated .htm file which corresponds with your form into the DocumentRoot directory of your Web Server installation
e.g. UnknownNow open this file to edit it using a text editor. (Note that permissions on some web servers may prevent you from writing directly to this folder, so you may wish to make the following edits before copying the .htm file to your web server)
-
Scroll down to the bottom of the .htm file, to locate the div with id omnisobject1. You need to edit the attributes of the div as follows:
-
Web Server URL - This should point to the relative location of the Omnis Web Server Plug-In on your web server and be of the form:
data-webserverurl="/<Omnis plug-in URI>"
e.g. data-webserverurl=""
-
Omnis Server and Port - This tells the Web Server Plug-In where to find the Omnis Server, and should be of the form:
data-omnisserverandport="<Omnis Server Address>:<$serverport of Omnis Server>"
The Omnis server address (and separating colon) can be omitted if it's running on the same machine as the web server.
-
Omnis Library & Omnis Class - Are the library name and remote form name of the form you wish to run. These should already be filled in correctly.
data-omnislibrary="<Library Name (without '.lbs')>"
data-omnisclass="<Class Name>"
-
Custom Parameters - Can be whatever you wish - these values will be sent as columns in the row variable which is passed as the first parameter to your form's $construct method.
data-param<N>="<Value>"
N can be a number between 1-9.
-

-
Locate the /html folder of your Omnis Server installation, and copy the: /icons, /css, /images, /scripts, /sounds and /themes folders from here into the DocumentRoot folder of your web server, at the same level as your .htm file you just copied in. Lastly, copy the iconset for your library (folder and icon image files) from the /iconsets folder in your Omnis development tree into the /icons folder that is now on your web server.
-
Apache often redirects a URL with "/icons/" to the /usr/share/apache2/icons folder, and you would then need to place all the icons for your app in that folder. Therefore, if you deploy your web or mobile app to an Apache server, you may want to rename the "icons" folder in Omnis by editing (adding) an entry in the Omnis configuration file (config.json). The "iconsFolder":"omnis_icons" configuration item in the server group of config.json defaults to "icons" if omitted or is empty, so you can change the name by adding your own value. You are recommended to use the same value for development and runtime, since the folder name is stored in the HTML for each remote form class.
-
Now, so long as your Omnis server is running your library, if a client visits the .htm file on your web server, the Omnis form should load and run.
e.g.
Copy the generated .htm file which corresponds with your form into your Omnis Server version's /html folder.
-
Your clients can now connect by visiting a URL of the form:
http://<IP address of Omnis Server Machine>:<$serverport of Omnis Server>/jschtml/<Form Name>.htm
E.g: http://192.168.1.10:5912/jschtml/myform.htm

 Facebook
 Github
 Instagram
 Linkedin
 Twitter
 Youtube
 Please logon or create a free account to download this file.
